Hi Guys want to add Music Player on your blog then come here.Putting music on Blog is not something very commendable, but there are models that players may be worth by being discreet, easy to customize and will not begin playing automatically.SCM Music Player is a great model that can be incorporated both in Blogger, Tumblr or WordPress.org, running audio from any tab, including links to YouTube videos, creating playlists customized and unique to your blog.

Add SCM Music Player Code Follow These Steps:-

  • Edit Playlist


  • Add some song URL and press sort playlist button

Configure Settings


  • Select Done to proceed.
  • Copy the code from the box.

Now After Copying Code Add SCM Music Player Code To Blogger Blog

  • Go to Blogger Dashboard > Layout > Add HTML/Javascript.
  • Now Paste SCM Music Player Code.
  • Save it.
Your Are Done Now Enjoy!!!! See The Change Don't Forget to Drop Your Comment
Read More
Now You can easily export all of your posts and comments into a single, Atom-formatted XML file for easy backup.Accidently your blog may get deleted and it cannot be undone. Or there could be lot of unpredictable reasons on the web that cause your blog get disappeared. We can't predict what threats there could be and what could be happened in next moment. So rather than finding solutions after a situation, prevention would be even more better.

Export Your Blog

All your blog content and corresponding Blogger comment form comments will be saved or exported here.

  • Go to Blogger Dashboard.
  • Click on your Blog Title.
  • Navigate to Settings.
  • Jump to Other tab below.
  • Click on Export blog link under the Blog tools heading.
  • Now click on Download Blog button in the pop up box. It will download your blog content and related comments for you stored in a XML file (.xml). Keep it in a safe place.
  • Close the pop up.
Import Your Blog

Here you can easily import all your saved content to your Blogger blog.
  • Go to Blogger Dashboard.
  • Click on your Blog Title.
  • Navigate to Settings.
  • Jump to Other tab below.
  • Click on Export blog link under the Blog tools heading.
  • Click on Choose File button on the pop up and click open after selecting your previously saved/exported blog content XML file (.xml).
  • Fill out the word verification beneath and check Automatically publish all imported posts option if you want to publish your imported posts automatically, right after importing them. Else after importing, your posts may remain unpublished until you navigate to your Blogger dashboard and publish each of them manually.
  • Now click on Import Blog button to import your blog content with corresponding post comments.

Note: If you importing content to a existing blog, then each of your imported posts will sorted by date and added to the particular places of your blog.

Now Close the pop up.
Read More

If want to Add more website to infolinks then its a great way to increase your earnings.I am also using infolinks on my other blog its so fantastic for me.Publishers can increase their earning by 5% to 7% by simply adding infolinks to one more site.Now only follow these steps to add more website to infolinks.

Add more websites to Infolinks:-

  • Logging into your account.
  • Select the ‘Add New Website’ option on the left-hand side as shown below.

  • Now simply fill your website's details and after completing click on submit.

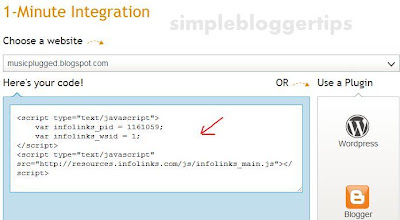
  • Now click on Integrate and choose your website.


  • Copy the given script and paste it on your Blog 
Your Done!!! Enjoy
Read More

If you are using wordpress as you are new,more than likely all of the themes you are looking at using are widgetized. For that special occasion that your WordPress blog theme isn’t widgetized, here’s a simple way of how to hack your theme, and with just a little bit of code, you can widgetize your theme.

As official page from Automattic says:
Instead of register_sidebar() you should use register_sidebars(n) where n is the number of sidebars. Then place the appropriate number in the dynamic_sidebar() function, starting with 1. (There are several other ways to use these function. See the API). You can even give your sidebars names rather than numbers, which lets you maintain a different set of saved sidebars for each theme.


Now You can edit this in the functions.php file. If you don’t have a functions.php file, then you probably don’t have a widgetized theme. Here’s an example of some code that you could put in your functions.php file:

Step 1:-

Look for functions.php (Create one if you don’t have). Insert the following code into it, save and close. We are done with functions.php. Basically what this codes does is – it register the sidebar as dynamic.


<?php
if ( function_exists(‘register_sidebar’) )
register_sidebar();
?>


Step 2:-

Here’s how a typical sidebar.php will look like.

<div id="sidebar">
<h2>Search this site</h2>
<div id="searchdiv">
<form id="searchform" method="get" action="<?php echo $_SERVER['PHP_SELF']; ?>">
<input type="text" name="s" id="s" size="20"/>
<input name="sbutt" type="submit" value="Go" alt="Submit" />
</form>
</div>
<h2><?php _e(‘Archives’); ?></h2>
<ul><?php wp_get_archives(‘type=monthly’); ?></ul>
<h2><?php _e(‘Categories’); ?></h2>
<ul><?php list_cats() ?></ul>
<h2><?php _e(‘Meta’); ?></h2>
<ul>
<?php wp_register(); ?>
<li><a href="<?php bloginfo(‘rss2_url’); ?>">RSS</a></li>
<li><?php wp_loginout(); ?></li>
</ul>
<?php wp_meta(); ?>
</div>


What you need to do here is to enclose an an-if statement into sidebar.php. The addition of codes are in bold.

<div id="sidebar">
<h2>Search this site</h2>
<div id="searchdiv">
<form id="searchform" method="get" action="<?php echo $_SERVER['PHP_SELF']; ?>">
<input type="text" name="s" id="s" size="20"/>
<input name="sbutt" type="submit" value="Go" alt="Submit" />
</form>
</div>
//
<?php if ( !function_exists(‘dynamic_sidebar’)
|| !dynamic_sidebar() ) : ?> // added
//
<h2><?php _e(‘Archives’); ?></h2>
<ul><?php wp_get_archives(‘type=monthly’); ?></ul>
<h2><?php _e(‘Categories’); ?></h2>
<ul><?php list_cats() ?></ul>
<h2><?php _e(‘Meta’); ?></h2>
<ul>
<?php wp_register(); ?>
<li><a href="<?php bloginfo(‘rss2_url’); ?>">RSS</a></li>
<li><?php wp_loginout(); ?></li>
</ul>
<?php wp_meta(); ?>
//
<?php endif; ?> // added
//
</div>


You are Done!!
Read More


Responsive and unique wordpress themes are the thirst of developers.As usage of tablets and mobiles phones is increasing very fast so the demand of responsive layouts are increasing too. Because responsive layouts respond according to whatever device the visitor uses. But if you don’t want to use responsive themes. 

You still can convert your WordPress blog into mobile formatusing WPTouch plugin.Responsive theme means that our theme will change its size according to the screen of device, This is a great feature and now a days very popular, If you are using a small mobile phone screen to open a website then it will be shown you very big in your screen, But! when you use responsive theme then it will directly re-size it according to the screen.All These are designed professionally by expert developers and all themes are free for your blog! There are 10+ free and responsive wordpress themes.So catch them all.

Bunker


Business Lite


Gridly Folio WordPress Theme
Mixfolio
Respo Theme


Oxygen

Responsive Wordpress Theme


Responsive Twenty Ten

Yoko

Skeleton WordPress Theme


Ari WordPress Theme


Demo 


DailyPost


Demo | Download

Whitelight
Read More
Next PostNewer Posts Previous PostOlder Posts Home