Nowadays many people seen a great offer on any modem and buy it.After expire of their offer they worried about tariff plan.So they trying to unlock their HSDPA modem,because some modem s works for just one network.Now todays i am going to post a trick Unlock Huawei and ZTE HSDPA Modems free after unlock you can use any networks.It takes just few seconds to unlock your modem.

1. Unlock Huawei HSDPA modems


When we put some other network sim card it will ask some code.So im going to generate that code.It is easy.first of all you have to find your IMEI of mode.it will mention on your modem or modem box its 15 digit.now follow this.

Paste this below address to your address bar.
http://bb5.at/huawei.php?imei= your Huawei modem IMEI number 

Now replace your Huawei modem IMEI number with your IMEI number like below
http://bb5.at/huawei.php?imei=357133035912053 

Press Enter key,after you will see like this


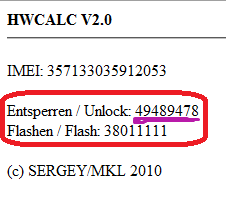
Now enter this unlock code when it ask the code. you are done.

2 . Unlock ZTE HSDPA modems


Some ZTE modems not asking unlock code.so no where to input our code.
so you can't do it like above method.you have to use some software for this.

Download software click here

First of all, if you use some memory card, remove it. remove sim card
and put sim card what you want to unlock.(it will display invalid sim)

Plug your modem in to your computer,sometime connection manager will display,close it.

Unzip what you download and open dccrap.exe 


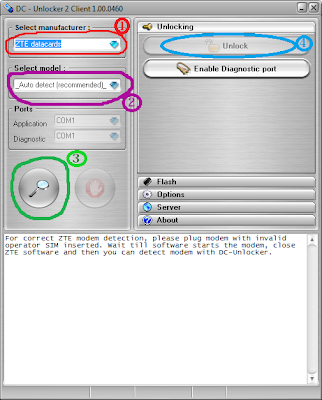
First select the manufacture as ZTE datacards ( No: 1)

Select the model as Auto detect (recommended) (No : 2 ) If you know the model and
which com port you use.u can do that way also

Click find button (No: 3) . after your modem model will display below box

After detect modem click unlock button (No: 4 )

cheers you are done.After few seconds modem will unlock restart your computer and use
your modem.This connection manager also working for this.
But if you want to use ZTE connection manager click below link to download.

click here to download.
Read More
This is my second post about Animated Blogger Recent Posts Widget.This widget comes with a very nicebackground including thumbnail.I also like this widget so much so in this tutorial i will help you to add this widget on your Blogger/Blogspot.Only you have to follow these simple step to add hope you like it.


Add Stylish Animated Blogger Recent Posts Widget in your Blogger
  • Go To Blogger > Design > Page Elements
  • Click on "Add a Gadget" link
  • From the pop-up window, choose HTML/JavaScript
  • Paste the following code:
<script src="http://ajax.googleapis.com/ajax/libs/jquery/1.3.2/jquery.min.js" type="text/javascript"></script>     
<style type="text/css" media="screen">      
<!-- 
#spylist {     
overflow:hidden;      
margin-top:5px;      
padding:0px 0px;      
height:350px;      
}      
.spydate{      
overflow:hidden;      
font-size:10px;  }

#spylist ul{      
width:350px;      
overflow:hidden;      
list-style-type: none;      
padding: 0px 0px;      
margin:0px 0px;      
}      
#spylist li {      
width:230px;      
background: #1ed2f2;
list-style-type: none;
margin:0 0 5px 0px;
padding:5px 5px 1px 10px !important;
-webkit-transition:all 0.2s ease;-moz-transition:all 0.2s ease;-o-transition:all 0.2s ease;border: 0 none !important;-webkit-border-top-left-radius:40px;-webkit-border-bottom-right-radius:40px;-moz-border-radius-topleft:40px;-moz-border-radius-bottomright:40px;border-top-left-radius:40px;border-bottom-right-radius:40px; 
}     

#spylist li:hover { 
background: #84f6f5;


#spylist li a {     
text-decoration:none;      
color:#4B545B;      
font-size:11px;      
height:18px;      
overflow:hidden;      
margin:0px 0px;      
padding:0px 0px 2px 0px;      
}      

#spylist li img {      
float:left;      
margin-right:5px;
margin-top:3px;       
background:none;      
border:0;      
}      

.spycomment{     
overflow:hidden;      
font-family:Tahoma,Arial,verdana, sans-serif;      
font-size:10px;      
color:#262B2F;      
padding:0px 0px;      
margin:0px 0px;      
-->
</style>
 <script language='JavaScript'> 


imgr = new Array();

imgr[0] = "http://i43.tinypic.com/orpg0m.jpg";

imgr[1] = "http://i43.tinypic.com/orpg0m.jpg";

imgr[2] = "http://i43.tinypic.com/orpg0m.jpg";

imgr[3] = "http://i43.tinypic.com/orpg0m.jpg";

imgr[4] = "http://i43.tinypic.com/orpg0m.jpg";
showRandomImg = true;

boxwidth = 255;

cellspacing = 6;

borderColor = "#232c35";

bgTD = "#000000";

thumbwidth = 70;

thumbheight = 70;

fntsize = 12;

acolor = "#666";

aBold = true;

icon = " ";

text = "comments";

showPostDate = false;

summaryPost = 40;

summaryFontsize = 10;

summaryColor = "#666";

icon2 = " ";

numposts = 10;

home_page = "http://simplebloggertips.blogspot.in/";

limitspy=4
intervalspy=4000

</script>

<div id="spylist">
    <script src='http://dl.getdropbox.com/u/708209/scriptabufarhan/recentspy/recentpostthumbspy-min.js' type='text/javascript'></script>
</div><a style=" float:right;font-size:8px; color:#3B78CD; text-decoration:none;" href="http://simplebloggertips.blogspot.in/">Blogger widget</a>

Replace http://simplebloggertips.blogspot.in/ with your Site URL

  • Now save your HTML/Javascript'.
  • And that's it!
Read More
This is my another post about Recent Posts Widget with animation as you know Recent Posts Widget help your visitors to find your recent posts quickly without spending time browsing you blog searching for your older posts.Special Thanks to Abufarhan for making this amazing script.Animated things are most attractive for visitors and this will attract your visitor easily.Now Add add this in your blog follow the few steps below.


Add Animated Recent Posts Widget in your Blogger
  • Go To Blogger > Design > Page Elements
  • Click on "Add a Gadget" link
  • From the pop-up window, choose HTML/JavaScript
  • Paste the following code:

<script src="http://ajax.googleapis.com/ajax/libs/jquery/1.3.2/jquery.min.js" type="text/javascript"></script>     
<style type="text/css" media="screen">      
<!-- 
#spylist {     
overflow:hidden;      
margin-top:5px;      
padding:0px 0px;      
height:350px;      
}      
#spylist ul{      
width:270px;      
overflow:hidden;      
list-style-type: none;      
padding: 0px 0px;      
margin:0px 0px;      
}      
#spylist li {      
width:270px;      
padding: 5px 5px;      
margin:0px 0px 5px 0px;      
list-style-type:none;      
float:none;      
height:70px;      
overflow: hidden;      
background:#fff url(http://dl.getdropbox.com/u/708209/scriptabufarhan/recentspy/post.jpg) repeat-x;      
border:1px solid #ddd;      
}     #spylist li a {     
text-decoration:none;      
color:#4B545B;      
font-size:11px;      
height:18px;      
overflow:hidden;      
margin:0px 0px;      
padding:0px 0px 2px 0px;      
}      

#spylist li img {      
float:left;      
margin-right:5px;      
background:#EFEFEF;      
border:0;      
}      
.spydate{      
overflow:hidden;      
font-size:10px;      
color:#0284C2;      
padding:2px 0px;      
margin:1px 0px 0px 0px;      
height:15px;      
font-family:Tahoma,Arial,verdana, sans-serif;      

.spycomment{     
overflow:hidden;      
font-family:Tahoma,Arial,verdana, sans-serif;      
font-size:10px;      
color:#262B2F;      
padding:0px 0px;      
margin:0px 0px;      
-->
</style>
 <script language='JavaScript'> 


imgr = new Array();

imgr[0] = "http://i43.tinypic.com/orpg0m.jpg";

imgr[1] = "http://i43.tinypic.com/orpg0m.jpg";

imgr[2] = "http://i43.tinypic.com/orpg0m.jpg";

imgr[3] = "http://i43.tinypic.com/orpg0m.jpg";

imgr[4] = "http://i43.tinypic.com/orpg0m.jpg";
showRandomImg = true;

boxwidth = 255;

cellspacing = 6;

borderColor = "#232c35";

bgTD = "#000000";

thumbwidth = 70;

thumbheight = 70;

fntsize = 12;

acolor = "#666";

aBold = true;

icon = " ";

text = "comments";

showPostDate = true;

summaryPost = 40;

summaryFontsize = 10;

summaryColor = "#666";

icon2 = " ";

numposts = 10;

home_page = "http://simplebloggertips.blogspot.in/";

limitspy=4
intervalspy=4000

</script>

<div id="spylist">
    <script src='http://dl.getdropbox.com/u/708209/scriptabufarhan/recentspy/recentpostthumbspy-min.js' type='text/javascript'></script>
</div>


Replace http://simplebloggertips.blogspot.in/ with your Site URL

  • Now save your HTML/Javascript'.
  • And that's it!
Note:-You can change width:270px as your choice.
Read More
      
Many have you heard Google is replacing Android Market with Google Play.Also Redirect Android Market Website To Google Play. This Rebranding Automatically Updates Icons, Name Market To Play Shop And Url Of Market.Android.Com To Play.Google.Com.Actually, Google Play is a combination of Android Market, Google Music and the Google eBookstore.“If your device can be updated, the Android Market app will automatically update to the Google Play Store app,”
Google says in a help center article. “Once you have it, the Google Play Store app automatically updates itself when new versions become available. This is a silent update, which means you will not see a notification and will not be prompted to update.”Those who would line to upgrade this now, they can easily do it as the Google Play Store APK has already made it online.

Follow these steps to upgrade it manually on your Android device:
  • Open Market And Update All Apps.
  • Change Settings To Auto-Update Apps.
  • Close Android Market App And Start Again.
  • Then Above Image Message Show Click Continue Button To Upgrade Android Market To Google Play.
Now You Have new Google Play App Installed In Your Android Phone. Download And Install Free Apps From Play Shop.
Read More

Want to get 10,000 Visitors to your web site each day.Then you are at right place todays i am going to post my personal killer ways to get more visitor to your Blog/Website.Generating traffic is one of the important factors involved in internet website business.For any type of Blog,Website web traffic is necessary in order to get visitors to your site so that your ultimate goal is achieved.Apart from increasing the popularity of your site, web traffic is an important tool which determines your business potential if you have enrolled into online affiiate programs like Google adsense. Many people simply don't know how to bring visitors to read their websites, despite having websites with quality content. In general, websites that have unique and quality content will get more traffic as compared to inferior sites which normally get ignored by search engines.So you can increase your website traffic from these ways.By Submitting your website to these search engines:

The best way to attract visitors because these provide never-ending traffic to your site. Major search engines like Google, Yahoo and MSN generate traffic to various websites around the world. In order to make your site appear in search engines, you need to submit your site to each of them.To increase page rank once you have submitted your site, you will need to increase your backlinks, create a sitemap (if you can), choose an excellent title, write useful, original content, update your site often, and get the word out about your site.
Submit your website to Google

Submit your website to Google through the below URL
google url submit
Submit your website to Yahoo
Submit your website to Yahoo through the below URL
yahoo url submit
Once you have added your website onto Yahoo, you can verify your website through the below link
(Unlike Google and MSN, you will need to become a member in order to submit your website)
Submit your website to MSN
Submit your website to MSN through the below URL
By Using Social bookmarking sites :

Social Bookmarking is an online web tool through which you can share your favorite articles, website links, photos and videos with the rest of the world. Social bookmarking sites have become very popular over the past few years because many people around the world prefer to use bookmarking sites to search for interesting topics or news, rather than use search engines like Google, Yahoo and MSN. Social bookmarking sites like Digg, Stumbleupon and Reditt have become quite popular among net savvy people nowadays

Submit your website link now:


By using chat rooms/forums:

Chat rooms and forums are a wonderful place for marketing your site since these serve as meeting point for a wide range of online communities.

By url URL Submissions to websites:

Submit your URL to the following websites:

SplatSearch URL Submit
Add your webpage to this search engine.
Scrub the Web
What a great site! Find out how your meta tags, keywords, title tag and other features are working (or not working) for your site, for FREE!
Exalead URL Submit
Exalead FREE URL Submission.
Jayde URL Submit
Free URL Submission through this site.
ExactSeek.com URL Submit
Create an account for FREE URL Submission.
WebSquash URL Submit
Enter a web address to start the crawler.
Suggest a Site to Open Directory
Have something worth submitting? The Open Directory Project is a web directory of Internet resources. A web directory is something akin to a huge reference library.
InfoTiger Website Submit
Try it out! Just submit your URL along with your email and you're good to go.
Submit your Website to Bing
Microsoft's newer search engine, Bing, and the page to submit your website to them.
Zujava
A brand new player to the world of article websites, Zujava was launched in January 2012. The SEO of Zujava is excellent, with on page meta descriptions, H2 and H3 tags, media capabilities for embedding YouTube and flickr galleries, RSS feeds, and good old fashioned text. Pages have been indexed quickly.
Xomba.com
Xomba is known for driving traffic and also for its Adsense monetization. Some publishers have seen upwards of $600 a day from one single article! While those results aren't typical, you can expect to make some Adsense money by adding your bookmarks or articles to this site. 
SheToldMe.com
An easy to use site that has a Digg style format. Add your link to the website along with a custom description for best results.
Best-Reviewer.com
Create a "top" list of hubs, Squidoo lenses, blog posts, websites, Amazon products, or anything else that you can think of.
Linkreferral.com
Link Referral has some benefits that I particularly like, but let me explain how it works for those who do not know.It is free.You also choose what category you want your website put in.


It is a toolbar that you download. (it only takes a second). On the toolbar you will see a new ad each time you move to a new page on the internet. Each time you see a new ad you earn a certain amount of credits. As you earn more credits your ad will be shown in the bar more often.I have received high praise from trusted sources about this free traffic method, which is why I joined.

By Using Free Classifieds to Drive Traffic

Free classifieds are another great technique for building traffic. People constantly search on online for specific services or products. Free classifieds target clients inclined to buying a particular kind of product or service.Free classified ads makes it easy for you to put free ads on quality web sites whenever you want, for free. 
Most of these free internet advertising companies give you 3 slots to advertise any product or service for free.Free classifieds can be a great way to get your products or services in front of millions of prospective consumers and you will start to see traffic. Depending what site you choose there can be a lot of traffic to be had through free classifieds.


By Using Ping Services to drive Traffic


Ping services allow you to automatically notify blog directories and search engines that your blog has been updated. The bigger your ping list the higher the chances of receiving traffic from those sources, here are the top best ping sites that I recommend you to use.

Start pinging:
Hope you make more traffic after reading this post.Don't Forget to Subscribe us
If you having any trouble then drop your comment!!!
Read More
Next PostNewer Posts Previous PostOlder Posts Home